How to Build Raised Garden Beds for Under $7 (Yes, Really!)
As more people embrace the joy of home gardening, one thing becomes clear, creating your own raised garden beds doesn’t have to cost a fortune. While many spend hundreds on pre-made kits or lumberyard supplies, I’ve discovered how to build raised garden beds under $7 using free, recycled, or low-cost materials. Whether you’re growing vegetables, herbs, or flowers, this affordable method helps you start a garden anywhere, backyard, patio, or small urban plot.
This guide will walk you through how to find free wood, repurpose everyday materials, and construct long-lasting, chemical-free raised beds on a budget. If you’re looking for cheap DIY garden beds, this step-by-step tutorial is your key to saving money while growing your own food.
| Item | Estimated Cost | Notes |
|---|---|---|
| Pallet Wood (4 boards) | $0.00 | Free from Facebook Marketplace, nurseries, or construction site scraps. |
| Galvanized Screws (approx. 20) | $1.50 | Rust-resistant; small box lasts for several beds. |
| Cardboard (for bed liner) | $0.00 | Reuse boxes or ask stores—great for weed control and moisture retention. |
| Organic Fill (leaves, clippings) | $0.00 | Collect from your yard or neighborhood for hugelkultur layering. |
| Topsoil + Compost Mix (~2 cu ft) | $5.00 | Buy in bulk or use from compost bins; cheapest garden mix available. |
| Plastic Liner (optional) | $0.50 | Cut up old shower curtain or use dollar store plastic. |
What You’ll Need: Low-Cost Materials for Raised Beds
Skip the expensive garden center kits, these simple supplies will help you get started for less than $7 per bed:
Free pallet wood or reclaimed lumber
Galvanized screws or nails
Drill or screwdriver
Old cardboard for bed lining
Organic fillers (leaves, straw, grass clippings)
Compost and topsoil mix for the top layer
Optional: plastic sheeting or old shower curtain for moisture control
Using untreated wood for raised garden beds is key to maintaining soil safety, especially for vegetables. Avoid pressure-treated lumber, which may contain harmful chemicals.
How to Build Raised Beds for Less Than $7
Follow these four essential steps to build a durable, low-cost raised garden bed using free or salvaged materials.
1. Find Free or Cheap Wood
To keep your raised bed build under $7, sourcing free or cheap lumber is key.
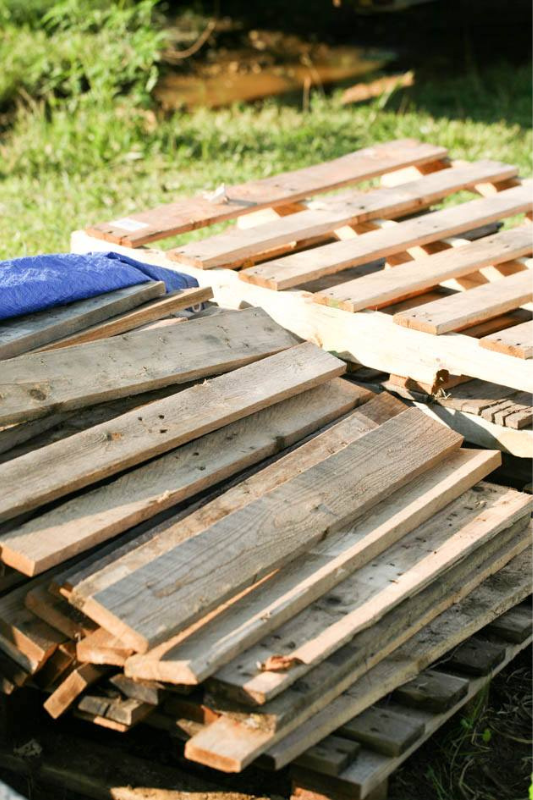
Where to Look:
Facebook Marketplace & Craigslist: Search terms like “free pallets,” “scrap wood,” or “free lumber.” Filter by local and message early!
Construction Sites: Builders often discard off-cuts or slightly damaged boards. Always ask for permission before taking.
Garden Centers & Nurseries: These places often throw out pallets, crates, or damaged shelving.
Community Gardens & Neighborhood Groups: Join local “Buy Nothing” or Freecycle groups, they’re goldmines for gardening materials.
Warehouse & Grocery Stores: These often receive inventory on wooden shipping pallets. Choose heat-treated (HT) pallets marked with “HT” and avoid chemically treated ones.
Pro Tip: Prioritize untreated pine, spruce, or cedar for garden safety, these woods are safe for growing food and rot-resistant for several seasons.
2. Cut and Assemble Your Frame
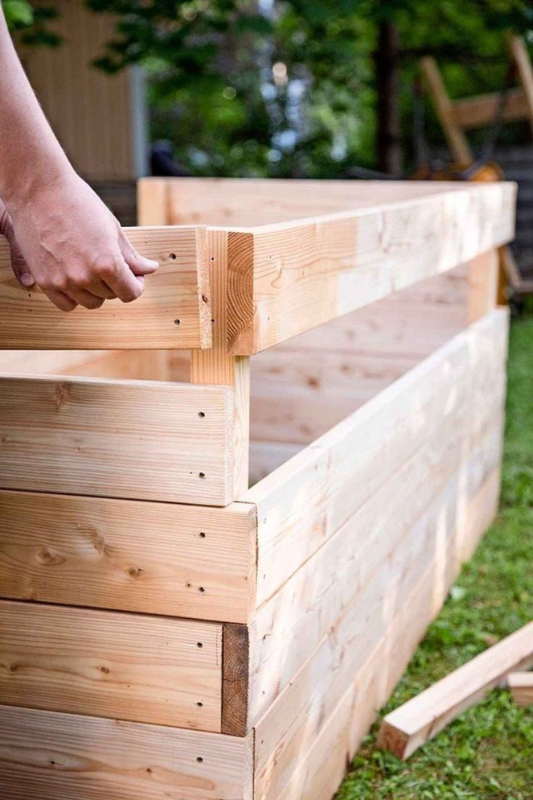
Once you’ve got your wood, it’s time to shape your bed.
Tools You’ll Need:
Handsaw or circular saw
Measuring tape
Power drill or screwdriver
Galvanized screws (2.5–3” recommended)
Optional: metal corner braces or L-brackets for added strength
Dimensions:
A 3’x6′ bed fits well in narrow yards or along fences.
A 4’x4′ square bed provides excellent access from all sides without needing to step inside.
Assembly Tips:
Cut 4 planks to size: two for the long sides and two for the ends.
Pre-drill holes to prevent wood splitting.
Align corners and fasten using screws or brackets.
For added support, hammer stakes or scrap boards vertically into the corners and screw the sides into them.
Build Note: Keep your design simple and modular. Avoid complicated cuts or angled joints, they increase your material waste and time.
3. Prepare the Base
Proper base preparation boosts drainage, suppresses weeds, and protects your garden soil.
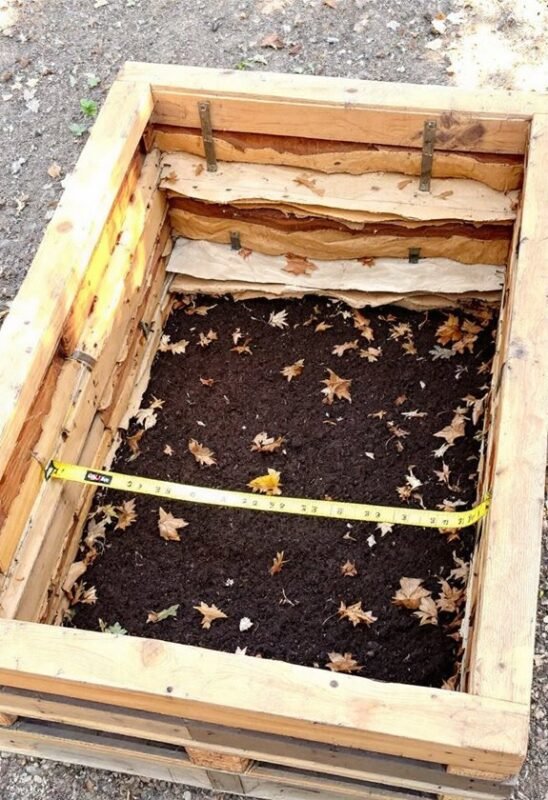
Steps:
Place your bed frame where you want it (sunny spots are best).
Pull any large weeds or grass clumps from underneath.
Line the bottom with 2–3 layers of flattened cardboard or newspaper.
Wet the cardboard to help it start breaking down and prevent it from blowing away.
Why Cardboard Works: It smothers weeds, retains moisture, and breaks down over time, feeding soil microbes as it composts.
4. Fill with Organic Layers (Hugelkultur Method)
Instead of spending $50+ on bagged soil, build a rich base using free organic matter.
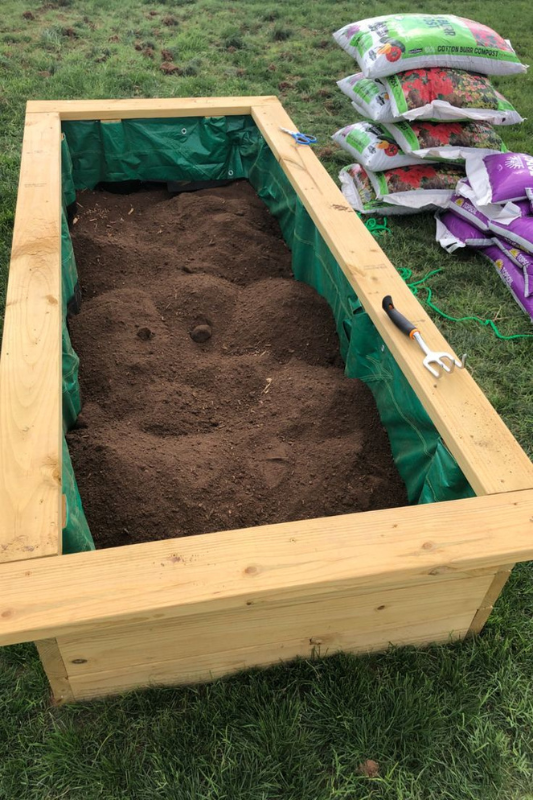
Layering Instructions:
Bottom Layer: Logs, thick sticks, or branches (6–8 inches deep). Acts like a sponge to retain water.
Middle Layer: Dried leaves, straw, grass clippings, shredded paper, or compost scraps. Add up to 6 inches.
Top Layer: 4–6 inches of quality topsoil mixed with finished compost. This is where your plant roots will grow.
Soil Savings Tip: You’ll need about 8–10 cubic feet of fill for a 4’x4′ bed at 12” deep, but this layering method reduces purchased soil by nearly half.
Raised Garden Bed Hacks to Save More
Use old plastic liners (from shower curtains or packaging) to help retain moisture and prevent weeds.
Keep your bed no wider than 4 feet for easy access from all sides.
Use basic tools only—you don’t need a table saw or fancy joiners for success.
Join local “Buy Nothing” or neighborhood Facebook groups to source free materials.
Benefits of Building Raised Beds on a Budget
Improves soil drainage and aeration
Reduces weed growth
Extends growing season with warmer soil
Easier to maintain for beginners and seniors
Ideal for small-space and container gardening
Environmentally friendly with recycled garden materials
You don’t need a big budget to start a productive home garden. By learning how to build raised garden beds for under $7, you unlock the potential to grow your own fresh produce, herbs, and flowers with minimal cost and maximum satisfaction. With a little effort and a lot of creativity, your DIY raised beds will thrive season after season, without breaking the bank.
